

The Ultimate Guide to 3D Printing: From Spaghetti Disasters to Engineering Masterpieces (A Complete Deep Dive)
I will never forget the exact afternoon my first 3D printer arrived.
I spend an absolute diagnostic amount of time watching tech unboxing videos, browsing niche subreddits, and looking at mechanical engineering marvels online. So, back in the day, when I finally bit the bullet and ordered a budget-friendly DIY 3D printer kit, I thought I was completely prepared. I imagined myself immediately printing custom phone cases, functional replacement parts for my kitchen appliances, and intricate geometric art pieces that would make my desk look like a Silicon Valley think tank.
Let’s just be honest about something first: reality hits you incredibly fast when you actually open that box.
Instead of a sleek, ready-to-go futuristic replicator straight out of Star Trek, I was greeted by a massive, confusing jigsaw puzzle of aluminum extrusions, stepper motors, a tangled web of colorful wiring, and a tiny, instruction manual that looked like it had been translated back and forth through five different languages before being printed. It took me a solid six hours, three cups of incredibly strong coffee, and a lot of quiet questioning of my life choices just to assemble the frame.
And my first print? It wasn’t a masterpiece. It was supposed to be a small, simple plastic boat—the legendary “3DBenchy,” which is the universal mascot for 3D printing benchmarking. Instead, about forty minutes into the process, the plastic detached from the heated bed. The printer didn’t know any better, so it just kept pumping out melted plastic into thin air. When I walked back into the room, my shiny new machine looked like it was violently choking on a massive, nested ball of plastic spaghetti.
I was frustrated, I was confused, and I felt like I had completely wasted my hard-earned cash.
But then, I spent some time troubleshooting. I learned how to level the print bed, I figured out the exact temperature requirements for different types of plastic, and I adjusted my slicing software settings. The next day, I pressed print again. Watching that tiny brass nozzle dance across the platform, laying down micron-thin layers of molten plastic with absolute, robotic precision, completely blew my mind. When I peeled that perfect, solid, three-dimensional object off the build plate with my own two hands, I was officially hooked.
Today, 3D printing has completely evolved from an obscure, frustrating hobby reserved for hardcore computer programmers and mechanical engineers into a mainstream, accessible superpower. Whether you want to prototype a medical device, print custom tabletop gaming miniatures, repair household items, or even manufacture aerospace components, this technology has changed the game.
Because the world of additive manufacturing is moving at a breakneck pace, I wanted to create a single, definitive pillar of content for you. No overly dense academic jargon, no confusing gatekeeping. This is your complete, deeply human guide to everything you need to know about 3D printing—how it works, the different types of machines, what materials you should use, how to avoid the dreaded “spaghetti monster,” and how to choose the perfect setup for your home or workshop.
Grab a drink, settle in, and let’s pull back the curtain on this incredible technology.
How Does It Actually Work? Demystifying Additive Manufacturing
Before we dive into the specific machines and buying guides, we need to break down the core philosophy behind 3D printing.
In traditional manufacturing, things are usually made using subtractive processes. Think of a sculptor taking a massive, solid block of marble and chipping away at it until a statue appears. Or an industrial CNC machine taking a solid block of aluminum and carving out a car part. You start with a lot of material, and you cut away what you don’t need, which naturally creates a ton of waste.
3D printing turns this entire concept completely on its head. It is an additive process. Instead of cutting material away, a 3D printer starts with a completely blank canvas and builds the object layer by agonizingly precise layer, from the ground up. Because it only places material exactly where it is needed, it is incredibly efficient, allowing for the creation of complex internal structures that would be literally impossible to manufacture using any traditional cutting tool.
Every single 3D print job, regardless of the machine you use, follows the exact same three-step digital-to-physical pipeline:
1. The 3D Model (The DNA)
Every print begins life inside a computer as a digital three-dimensional blueprint. You can create these files yourself using Computer-Aided Design (CAD) software like Fusion360, Blender, or TinkerCAD. But let’s be real: if you aren’t a digital 3D artist, you don’t have to design things from scratch. The 3D printing community is wildly generous. Websites like Printables, Thingiverse, and Thangs host millions of pre-made, completely free 3D models that you can download with a single click. These files typically come in formats like .STL, .OBJ, or .3MF.
2. The Slicer (The Brains)
Your 3D printer is a brilliant piece of hardware, but it is fundamentally blind. It doesn’t understand what a “boat” or a “gear” is. It only understands basic spatial coordinates and commands to move along specific axes. This is where slicing software comes into play. You import your digital model into a program like PrusaSlicer, Cura, or Bambu Studio. The slicer literally cuts the digital model into thousands of flat, horizontal, paper-thin layers. It then translates those layers into a massive script of coordinates and commands known as G-code. This G-code tells the printer exactly where to move, how fast to go, and how much material to output.
3. The Print (The Muscle)
You feed that G-code file into the printer via an SD card, a USB drive, or a Wi-Fi network. The machine reads the script line by line, heats up its components, and executes the commands, physically stacking those horizontal slices on top of each other until a tangible, solid object exists in the real world.
FDM vs. Resin: The Two Titans of Desktop Printing
If you start shopping for a 3D printer today, you will quickly realize that the market is completely dominated by two wildly different technologies. Choosing between them is the single biggest decision you will have to make. Let’s break down how they work, what they excel at, and where they fall flat.
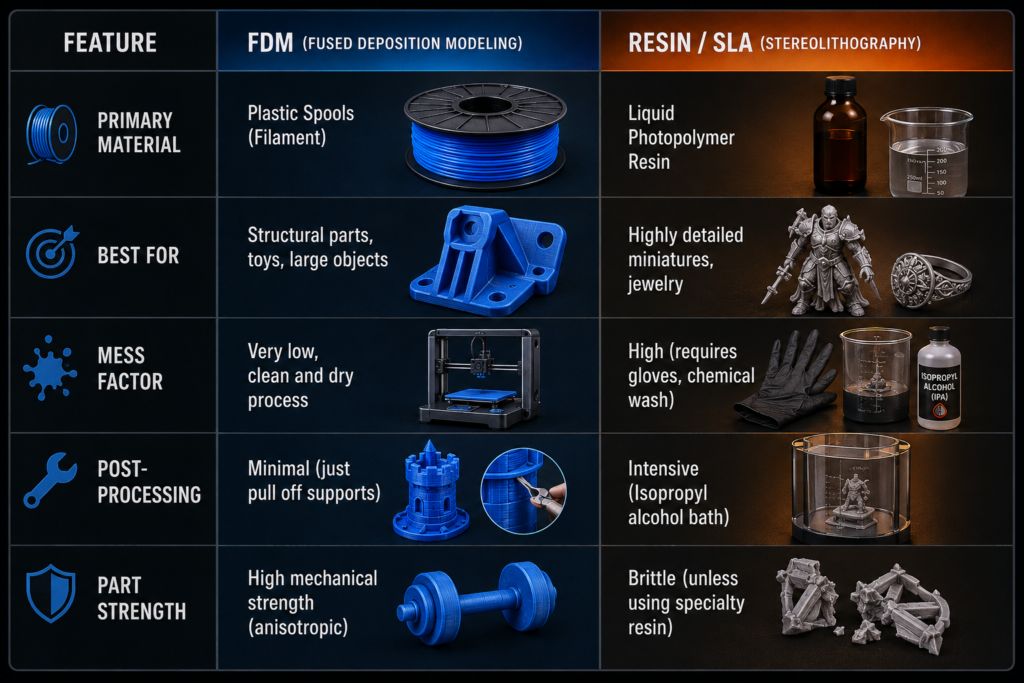
FDM (Fused Deposition Modeling)
FDM is the classic style of 3D printing that most people picture in their minds. It works essentially like an incredibly advanced, computer-controlled hot glue gun.
The printer uses a large spool of plastic wire called filament. A motor pushes this filament into a heated metal block called a hotend, where it melts at temperatures usually ranging between $200^\circ\text{C}$ and $300^\circ\text{C}$. The melted plastic is forced through a tiny brass or hardened steel opening called a nozzle (typically just 0.4mm wide). The print head moves systematically along the X and Y axes, drawing the first layer of the object onto a heated build plate. Once that layer cools and solidifies, the machine moves up slightly along the Z-axis, and draws the next layer right on top of it.
Why FDM Rules:
- Massive Variety of Materials: You can print with basic plastics, flexible rubber-like materials, carbon-fiber infused polymers, and even wood-filled filaments that can be sanded and stained like real lumber.
- User-Friendly and Clean: It is a completely dry process. When a print finishes, you just wait for the bed to cool, pop the plastic piece off, and it is ready to use immediately.
- Structural Integrity: FDM parts are fantastic for mechanical and functional applications, like brackets, mounts, or custom enclosures.
The Downsides of FDM:
- Visible Layer Lines: Because you are stacking lines of plastic, you can almost always see and feel the ridges along the sides of the object.
- Detail Limitations: If you are trying to print a tiny, 28mm-tall tabletop gaming figurine with intricate facial expressions and tiny fingers, an FDM printer’s nozzle is simply too blunt an instrument to capture those microscopic details perfectly.
Resin / SLA (Stereolithography)
Resin printing takes a completely different, almost magical scientific approach. Instead of melting solid plastic, it uses a vat of liquid chemicals called photopolymer resin. This liquid has a unique property: it instantly hardens into a solid plastic when it is exposed to specific wavelengths of ultraviolet (UV) light.
The printer features a liquid vat with a crystal-clear, flexible plastic bottom. Beneath this vat sits an ultra-high-resolution LCD screen (often 4K, 8K, or even 14K resolution). A metal build platform lowers itself completely into the liquid resin, leaving just a microscopic gap between the platform and the bottom of the vat. The LCD screen flashes an image of the first layer using UV light, instantly curing the liquid trapped in that tiny gap into a solid sheet of plastic. The platform lifts up slightly, allowing fresh liquid resin to flow underneath, lowers back down, and flashes the next image.
Why Resin Rules:
- Mind-Blowing Detail: Because resin printing relies on light pixels rather than a physical brass nozzle, the level of detail is completely unparalleled. The layers are so incredibly thin (often measuring just 20 to 50 microns) that the finished parts look perfectly smooth, resembling professionally injection-molded retail products.
- Perfect for Micro-Modeling: If you are an avid Warhammer player, a jewelry designer making master molds for investment casting, or a dentist printing dental models, resin is the gold standard.
The Downsides of Resin (The Real Talk):
- The Mess and Safety Protocol: Let’s just be completely honest here—resin printing can be an absolute logistical nightmare. Liquid resin is toxic to touch and breathes out intense, noxious chemical fumes. You must wear nitrile gloves, protective eyewear, and operate the machine in a dedicated, well-ventilated space (not your bedroom or kitchen).
- Intense Post-Processing: When a resin print finishes, it emerges dripping in wet, toxic sludge. You have to wash the part in a bath of highly concentrated Isopropyl Alcohol (IPA) to dissolve the uncured liquid, carefully remove the supporting structures, and then place the part under a dedicated UV curing lamp to fully bake and harden the plastic.
Navigating the Filament Jungle: What Should You Build With?
If you opt for an FDM printer, your next big challenge is staring down the massive wall of filament options available online. Not all plastics are created equal, and choosing the wrong material for your project can lead to warped prints, clogged nozzles, or parts that completely snap under the slightest bit of stress.
Let’s break down the core filaments you need to know about.
PLA (Polylactic Acid): The Undisputed King of Beginners
If you are just starting your journey, do yourself a massive favor and buy a couple of spools of PLA. It is derived from natural, renewable resources like cornstarch and sugarcane, meaning it doesn’t emit horrible, toxic fumes when melting—instead, it actually smells slightly sweet, like toasted marshmallows.
PLA is the easiest material to print by a wide margin. It melts at a relatively low temperature ($200^\circ\text{C}$ to $220^\circ\text{C}$), expands very little when heated, and shrinks minimally when cooled. This means you don’t have to worry about the corners of your print warping or peeling away from the build plate. It is incredibly rigid and comes in thousands of finishes, from glossy silvers to gorgeous matte pastels.
- Best Used For: Cosplay armor, display models, prototyping, desk organizers, and low-stress toys.
- Avoid Using For: Anything that lives inside a hot car or sits out under direct, blazing sunlight. PLA has a very low thermal resistance; if you leave a PLA part on your dashboard during a hot summer day, it will literally droop, warp, and melt into a sad puddle of plastic.
PETG (Polyethylene Terephthalate Glycol): The Durable Daily Driver
Ever wonder what plastic soda bottles are made of? It’s a close relative of PETG. This material is the perfect evolutionary step once you feel comfortable with PLA but need something with significantly more mechanical resilience.
PETG balances the ease of use of PLA with the rugged durability of high-end industrial plastics. It is highly chemical-resistant, completely waterproof, and can easily withstand temperatures up to around $80^\circ\text{C}$ without breaking a sweat. It also possesses a slight bit of flexibility, meaning that under intense pressure, a PETG part will bend slightly rather than snapping violently like brittle PLA.
- Best Used For: Mechanical gears, outdoor garden tool brackets, water bottles, and functional automotive interior clips.
- The Catch: PETG is incredibly “stringy.” It loves to ooze out of the nozzle during travel moves, leaving thin, spiderweb-like strands of plastic all over your finished print that you’ll have to clean up later with a heat gun.
ABS & ASA: The Heavy-Duty Industrialists
Before the modern explosion of beginner-friendly materials, ABS (Acrylonitrile Butadiene Styrene) was the bedrock of 3D printing. It’s the exact same tough-as-nails plastic that LEGO bricks are made of. ASA is a modern alternative that adds incredible UV resistance to the mix.
These materials are incredibly tough, impact-resistant, and can withstand intense heat. However, printing them on a standard desktop setup is an absolute nightmare. As ABS cools down, it shrinks drastically. If a cool draft of air hits an open ABS print, the layers will instantly contract, causing the part to warp, crack down the middle, or peel violently off the bed.
- Requirements: To print ABS or ASA successfully, you must use a fully enclosed 3D printer that traps the ambient heat inside the chamber. Furthermore, melting ABS releases Styrene gas—a known toxic carcinogen—meaning your enclosure needs to be properly filtered or vented out a nearby window.
Anatomy of a Modern 3D Printer: Key Features to Look For
If you are looking to purchase a machine today, the market looks radically different than it did just a few years ago. In the past, the hobby was dominated by “Bed Slingers”—printers where the build plate moves back and forth along the Y-axis while the print head moves up and down. Today, high-speed CoreXY machines are taking over the landscape.
When you are comparing models, these are the non-negotiable features you should be looking out for:
1. Automatic Bed Leveling (ABL)
Let me be completely blunt: manually leveling a 3D print bed using a piece of paper and four tiny plastic knobs under the platform is the single most frustrating experience in the entire hobby. It requires microscopic precision, and if you get it wrong by even a tenth of a millimeter, your print will fail. Modern printers feature built-in electronic probes or strain gauges that automatically scan the surface of the build plate before every single print, creating a digital matrix map to automatically compensate for any imperfections. Do not buy a printer without auto-bed leveling.
2. Direct Drive vs. Bowden Extruders
The extruder is the motor assembly that physically pushes the plastic filament.
- In a Bowden setup, the extruder motor is mounted statically to the frame of the printer, and it pushes the filament through a long, flexible plastic tube to reach the moving print head. This makes the print head incredibly light, but it introduces a lot of mechanical lag, making it very difficult to print flexible materials like TPU.
- In a Direct Drive setup, the motor is mounted directly on top of the print head itself. It pulls the filament directly into the hotend. While this adds extra weight to the print head, the level of precision and material compatibility it offers is vastly superior.
3. Smart Enclosures and High Speeds
The latest generation of consumer 3D printers can print at absolutely mind-boggling speeds—often exceeding 500 millimeters per second. They achieve this through advanced firmware algorithms like Input Shaping, which uses internal accelerometers to measure the physical vibrations of the machine and actively cancels them out in real-time, preventing your prints from suffering from visual artifacts like “ghosting” or “ringing.”
Troubleshooting 101: How to Fix the Three Most Common Print Failures
Even if you buy the most expensive, automated 3D printer on the market, you will experience failed prints. It is an inevitability of the hobby. Instead of throwing your tools across the room in frustration, memorize this quick diagnostic guide to get your machine back on track.
1. The Dreaded First Layer Peeling
You walk away from your machine, come back an hour later, and find that the bottom corners of your object have curled upward, or the entire print has detached completely and is rolling around the chamber.
- The Cause: Poor bed adhesion. Plastic expands when hot and contracts when cool. If the first layer doesn’t fuse perfectly to the build surface, those thermal forces will pull it right off.
- The Fix: First, clean your build plate! The natural oils from your fingertips act like a layer of Teflon to molten plastic. Take the build plate to your kitchen sink and scrub it thoroughly with warm water and basic dish soap. If that doesn’t work, jump into your slicing software and slow down your first-layer print speed, or increase the heated bed temperature by $5^\circ\text{C}$.
2. Under-Extrusion (The Crunchy, Holy Print)
Your finished print looks incredibly fragile, feels light like a cracker, and features visible gaps, holes, and missing lines of plastic throughout the structure.
- The Cause: Your printer is trying to push filament out, but something is physically blocking the path, meaning less plastic is emerging from the nozzle than the machine intends.
- The Fix: This is almost always caused by a partial clog inside the hotend. You can perform a “cold pull”—a technique where you heat the nozzle up halfway, allow the filament to semi-solidify, and then yank it out forcefully to pull the dust and burnt plastic debris out along with it. Alternatively, check your extruder gear; sometimes, plastic dust can get trapped in the metal teeth, causing them to slip against the filament.
3. Intense Stringing and Oozing
Your print finishes, and while the structure looks solid, it is completely covered in a dense fog of incredibly fine, microscopic hairs of plastic connecting different parts of the model.
- The Cause: Your retraction settings are incorrect, or your filament is physically saturated with water. Yes, you read that correctly: plastic is hygroscopic, meaning it actively absorbs moisture straight out of the ambient humidity in your room. When wet filament enters the $200^\circ\text{C}$ hotend, that trapped water boils instantly, turning into steam pockets that violently blast melted plastic out of the nozzle during travel moves.
- The Fix: You need to dry your plastic. You can invest in a dedicated filament drying box, or use your printer’s heated bed with a cardboard box flipped over it to bake the moisture out of the spool for a few hours before printing.
Frequently Asked Questions (FAQs) About 3D Printing
Because entering the world of additive manufacturing involves navigating a massive mountain of information, we have compiled the absolute most common questions beginners ask to help give you a clear, roadblock-free path forward.
Q: Is 3D printing an expensive hobby to get into?
A: Not anymore! While professional industrial machines cost tens of thousands of dollars, the consumer desktop market has completely exploded with affordable options. You can pick up an incredibly capable, highly automated entry-level FDM printer for between $150 and $300. A standard 1-kilogram (2.2 lbs) spool of high-quality PLA filament will run you about $15 to $25 and can print dozens of small-to-medium-sized items.
Q: Can you make money with a home 3D printer?
A: Absolutely, but you have to be smart about it. Trying to sell basic plastic trinkets on Etsy is a race to the bottom because the market is incredibly saturated. The real money lies in solving specific, niche problems. People make fantastic side incomes by designing and printing custom car dashboard mounts, cosplay prop kits, specialized organizational trays for toolboxes, or offering localized prototyping services to local small businesses and inventors.
Q: Are the fumes from a 3D printer dangerous to breathe?
A: It depends entirely on the material you are printing. Basic PLA and PETG emit virtually zero toxic volatile organic compounds (VOCs) and are perfectly safe to run in a standard office or living room. However, materials like ABS, ASA, and liquid photopolymer resins release intense, toxic chemical fumes and particulates. These machines must be housed inside an enclosed space fitted with an active carbon/HEPA filtration system or placed in a room with a window exhaust.
Q: How long does it actually take to print an object?
A: 3D printing is a game of extreme patience. Because objects are built layer by ultra-thin layer, print times can range drastically. A tiny keychain might take 10 to 15 minutes. A medium-sized coffee mug could take anywhere from 2 to 6 hours. A massive, full-sized cosplay helmet can easily take 24 to 72 hours of continuous printing to complete. However, modern high-speed printers built on CoreXY architecture have slashed these historical print times down by up to 70%.
Q: Do I need to know how to code or use 3D modeling software to use one?
A: Not at all. You do not need a single line of coding knowledge. While knowing how to use 3D modeling tools like CAD is incredibly helpful for creating custom-tailored functional fixes, you can easily live off the massive, global ecosystem of pre-designed models. Websites like Printables allow you to browse and download files for free, which you simply drop into a user-friendly slicing program that handles all the complex background math automatically.
Q: Can a 3D printer print metal objects?
A: True industrial metal printing (using high-powered lasers to sinter industrial metal powders) exists but costs hundreds of thousands of dollars and requires complex chemical setups. However, for a standard home desktop machine, you can buy “metal-infused” filaments. These are PLA plastics mixed with a massive percentage of real copper, bronze, or brass powder. The resulting prints feel incredibly heavy, cold to the touch, and can be sanded and polished until they look like cast metal.
Q: What happens if the power goes out right in the middle of a long print?
A: In the early days of the hobby, a power flicker meant your print was completely ruined. Today, almost every modern 3D printer features an automated system called Power Loss Recovery. The moment the machine detects a drop in voltage, it instantly saves its exact coordinate line to its internal flash memory. Once the power returns, the machine re-heats its nozzle, homes itself safely, and continues printing exactly where it left off.
Q: Can 3D printed parts be sanded, painted, or finished?
A: Yes, and that is where the real magic happens. If you want your prints to look like store-bought products rather than raw plastic, you can easily post-process them. You can sand down FDM layer lines using progressively finer grits of sandpaper, apply a layer of “filler primer” spray to fill in any remaining micro-gaps, and then paint them using basic acrylics or spray paints.














Leave a Reply